
T.O. 33A1-3-358-11/TM 11-6625-842-15
Section III
NAVAIR 16-30APM239-2
Paragraphs 3-1 to 3-4
SECTION III
OPERATING INSTRUCTIONS
INTRODUCTION.
3-1.
This section contains information and procedures required for personnel cooperate the test set.
3-2.
Included in the section is a list of controls, indicators, and connectors; descriptions of how auxiliary and acces-
sory equipments are to be used; starting and stopping instructions; and operating procedures.
CONTROLS, INDICATORS AND CONNECTORS.
3-3.
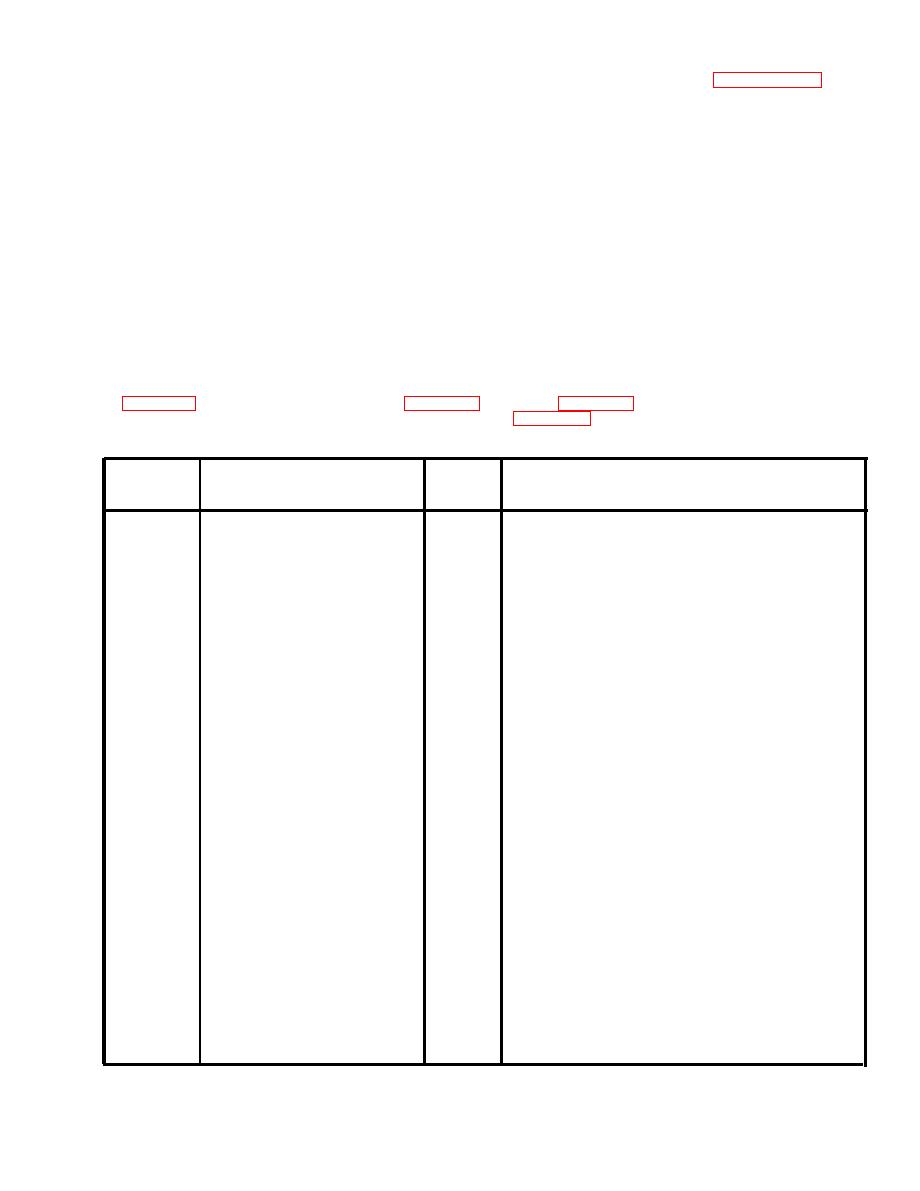
3-4. A list of the controls, indicators, and connectors located on the front panel of the test set is contained
in figure 3-1. The information contained in figure 3-1 is keyed to figure 3-2, which illustrates the controls,
indicators, and connectors as they appear on the front panel. Figure 3-1 also contains the reference designa-
tion and a brief description of the function performed by each control, indicator, and connector.
PANEL
INDEX NO.
REF
NOMENCLATURE
DESIG
(FIG. 3-2)
FUNCTION
1
6 AMP POWER circuit
CB1
Circuit breaker applies 115 volts ac to the test set
breaker
and to the equipment under test.
Protects the 28-volt d-c power supply.
10 AMP DC fuse
F2
2
POWER ON indicator
DS1
White lamp lights to indicate that the test set is
3
energized.
1/2 AMP DC fuse
Provides overload protection for the 28-volt d-c
F3
4
output to TRANSPONDER connector J2.
SWITCHED AC POWER
5
DS2
Red lamp lights to indicate that the power relay in
indicator
the receiver-transmitter is energized and that the
115-volt a-c switched output of the receiver-trans-
mitter is available.
2 AMP AC fuse
F1
Protects the 115-volt a-c output line.
6
7
PANEL LIGHTS switch
S1
Normally in the OFF position. When used with
Transponder Set Control C-6280(P)/APX or
C-6280A(P)/APX which has 28-volt lighting, it is
placed in the 28V position to energize the panel
lights of the set control when required; when used
with a Transponder Set Control C-6280(P)/APX or
C-6280A(P)/APX which has 6-volt lighting, it is
placed in the 6V position to energize the panel
lights of the set control when required.
CAUTION
Do not place the PANEL LIGHTS switch in
the 28V position when operating with Trans-
ponder Set Control C-6280(P)/APX or
6280A(P)/APX which has 6-volt lighting.
Figure 3-1. Controls, Indicators, and Connectors (Sheet 1 of 4)
3-1
